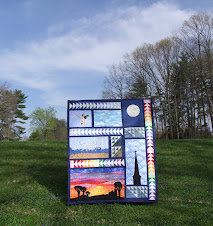
I just posted pictures of the Barn Quilts of Champaign County that I just saw yesterday, in my other blog. Here is the link: Barn Quilts of Champaign County, Ohio.....
I will add a link here for an on-line album. http://share.shutterfly.com/share/received/album.sfly?sid=0JZNnDRq3YsWy&startIndex=0&fid=e6d1094005c0196f
In July we saw quilt barns in Kentucky! I posted those in my other blog at this link:Kentucky Quilt Trail.....
Sunday, September 14, 2008

Wednesday, September 10, 2008
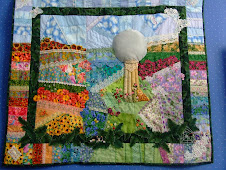
Not My Grandmother's Flower Garden......2006
This will probably always be my own personal favorite quilt because it holds so many memories.
In 2006 the Raintree Quilt Guild announced a challenge with the theme "Nature's Masterpieces". That night my mind decided I wanted to do a crazy quilt with all the beautiful flower fabrics I had been collecting and to put a 3-D "garden ball" in the center of the garden. As usual, my creative mind is way beyond my skill level! I've always wanted to do a crazy quilt and this became a learning experience for me! Garden balls have a lot of fond memories for me.....both of my Grandmother's flower garden and of our peony bed in Indianapolis where I grew up. Grandma probably had a lot to do with my early love of flowers, so this quilt became dedicated to her.
 I'll just put a lot of photos to try to show some of the details. I litereally worked with a book of crazy quilt stitches open next to me and tried whatever looked interesting. I learned a lot of things and made some mistakes, but that never stops me from loving a project when I'm done :-)
 I was trying to photograph part of the border to show some of the stitching. All of these photos should be able to click and make them larger.
 The cats are "store bought" patches, so please don't think I stitched them! I learned to make ribbon roses and tried some other ribbon flowers as well.
 The pedestal for the ball was my own design and I stuffed it and then decided it was too fat. The pink roses on the pedestal are store bought, but the rest are all hand made. I love adding beads to stuff and stitched them all over this thing! The ball itself was hard to figure out and I intended to dab fabric paint reflections on it to make it look more real, but my experimenting with that didn't work out. So it doesn't shine like a real "gazing ball".
 Where flower fabric meets the sky or border, I tried to extend the chopped off flowers with embroidery stitching and beads.
 I decided to add these 3-D ferns and never really liked how it looked or the dark border in general.....too wide, I think now. Oh, well....more learning!
 Every crazy quilt is suppose to have a spider's web for good luck. That was fun! I made the spider out of buttons. I added lace bits all over the thing. To me, crazy quilts are a mix and match of all sorts of things, so I just aimed for that :-)
 The back of the quilt became like a second quilt! I decided to add pictures, even though no one but me would ever see them or know they were there! Sort of a waste, but I just wanted them there.
 A flat version of the ball became the label dedicated to my Grandmother Herner.
 Garden balls have a lot of fond memories for me.....both of my Grandmother's flower garden and of our peony bed in Indianapolis where I grew up. Grandma probably had a lot to do with my early love of flowers, so this quilt became dedicated to her.
 I'll just put a lot of photos to try to show some of the details. I litereally worked with a book of crazy quilt stitches open next to me and tried whatever looked interesting. I learned a lot of things and made some mistakes, but that never stops me from loving a project when I'm done :-)
 I was trying to photograph part of the border to show some of the stitching. All of these photos should be able to click and make them larger.
 The cats are "store bought" patches, so please don't think I stitched them! I learned to make ribbon roses and tried some other ribbon flowers as well.
 The pedestal for the ball was my own design and I stuffed it and then decided it was too fat. The pink roses on the pedestal are store bought, but the rest are all hand made. I love adding beads to stuff and stitched them all over this thing! The ball itself was hard to figure out and I intended to dab fabric paint reflections on it to make it look more real, but my experimenting with that didn't work out. So it doesn't shine like a real "gazing ball".
 Where flower fabric meets the sky or border, I tried to extend the chopped off flowers with embroidery stitching and beads.
 I decided to add these 3-D ferns and never really liked how it looked or the dark border in general.....too wide, I think now. Oh, well....more learning!
 Every crazy quilt is suppose to have a spider's web for good luck. That was fun! I made the spider out of buttons. I added lace bits all over the thing. To me, crazy quilts are a mix and match of all sorts of things, so I just aimed for that :-)
 The back of the quilt became like a second quilt! I decided to add pictures, even though no one but me would ever see them or know they were there! Sort of a waste, but I just wanted them there.
 A flat version of the ball became the label dedicated to my Grandmother Herner.
I chose the name as a play on the title of a real quilt block called "Grandmother's Flower Garden" which looks NOTHING like this quilt :-) However, it made me think of MY grandmother and her flower garden.
 Here is Grandma by her garden ball.
 My sisters and I visting at Easter time posing with Grandma and the garden ball.
 Here is Grandma by her garden ball.
 My sisters and I visting at Easter time posing with Grandma and the garden ball.
I'm the little one in the red dotted swiss dress :-)
 Me with my first peony at home in Indianapolis.
 My sisters with peonies next to our garden ball.
This quilt was a work of love for me and a lot of fun and hangs in my sewing room for me to enjoy. It's not a great quilt, but a speacial one in my heart.
 Me with my first peony at home in Indianapolis.
 My sisters with peonies next to our garden ball.
This quilt was a work of love for me and a lot of fun and hangs in my sewing room for me to enjoy. It's not a great quilt, but a speacial one in my heart.
Tuesday, September 9, 2008
My first 2 quilts.....1984 and 1985
My very, very first quilt! I saw an article in a magazine about making a quilt out of bluejeans and decided to try this for my son, Steven. It's really nice that there are so many different shades of bluejeans so you get a nice variety. I had no idea what I was doing but cut a 6" pattern out of a piece of cardboard. Then I cut up every pair of old bluejeans that I could get my hands on! We always made "cut-offs" from our jeans, so that was pretty easy, plus I was working part time at a school clothing bank that wanted to get rid of some jeans that were too large for the school kids. After I got the top done I didn't have a clue what to do next! I went to my church which had a quilt group and they suggested that because it was so heavy, I did not need batting and to just buy a flannel sheet for the back. Great idea! They showed me how to tie it, also.
 This thing is so sturdy and we now carry it in the trunk of the car for impromptu picnics and used to take it to football games to sit on the concrete bleachers. It will probably outlast all of us! Some people make these and leave the pockets on some of the blocks, but I never even though about that back then! I later made him a larger size one when he got taller.
 Since the bluejeans were successful, I decided to make Emily a rainbow quilt for her 7th birthday. I cut up old fabric that I had made her baby clothes and dresses from, as well as some that I made myself dresses from, and also the fabric that is in both of the kid's Christmas stockings......so this one has a world of memories quilted into it! Just like the pioneer women, I mostly "used what I had". I had to buy orange and yellows, because I never used those colors much.
 I wanted this to look like a "real quilt" so I took it to the ladies at St. Andrew's Presbyterian Church and they quilted it for me. I think it is a very cheerful quilt!
 Here is Emily on her bed with a few of her koalas and the quilt. Her taste is now more geared to black and modern stuff, so this quilt will probably always mean more to me than it ever did to her :-) I hope to make her a lap quilt for Christmas, but she really doesn't like quilts that much.....too "crafty" looking. Is this really my daughter???
 After I got the top done I didn't have a clue what to do next! I went to my church which had a quilt group and they suggested that because it was so heavy, I did not need batting and to just buy a flannel sheet for the back. Great idea! They showed me how to tie it, also.
 This thing is so sturdy and we now carry it in the trunk of the car for impromptu picnics and used to take it to football games to sit on the concrete bleachers. It will probably outlast all of us! Some people make these and leave the pockets on some of the blocks, but I never even though about that back then! I later made him a larger size one when he got taller.
 Since the bluejeans were successful, I decided to make Emily a rainbow quilt for her 7th birthday. I cut up old fabric that I had made her baby clothes and dresses from, as well as some that I made myself dresses from, and also the fabric that is in both of the kid's Christmas stockings......so this one has a world of memories quilted into it! Just like the pioneer women, I mostly "used what I had". I had to buy orange and yellows, because I never used those colors much.
 I wanted this to look like a "real quilt" so I took it to the ladies at St. Andrew's Presbyterian Church and they quilted it for me. I think it is a very cheerful quilt!
 Here is Emily on her bed with a few of her koalas and the quilt. Her taste is now more geared to black and modern stuff, so this quilt will probably always mean more to me than it ever did to her :-) I hope to make her a lap quilt for Christmas, but she really doesn't like quilts that much.....too "crafty" looking. Is this really my daughter???
(I just realized that I made this for her 7th birthday and today is her 7th anniversary!)
Saturday, September 6, 2008
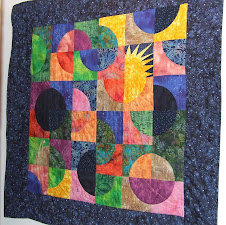
Dark Side of the Moon.....2004-2006
I started this quilt in 2004 and didn't finish it until 2006.
I have always wanted to have a traditional 2-color Drunkard's Path quilt, but didn't think I could do the curved piecing. So when a local quilt shop taught a class, I took it. I love batiks and wanted to try using them. It wasn't as hard as I thought to make the blocks, but I still do not think I have the patience to do a traditional Drunkard's Path quilt that would be bed sized. After bringing my stack of partly finished blocks home from the class, I decided that I wanted to lay them out in a sort of "planet" effect and wanted a really dark circle to be a moon. I ended up using a dark flannel for all the dark circle arcs because it was darker looking than most of the cotton fabrics. I had no real "plan" at this point......as usual! I happened to watch a Simply Quilts show where they were paper piecing "rays" like in my sun block, so I immediately decided to add a sun! Well.....I hadn't done it before and it is a bit crooked, but I got the look I wanted.
 My final lay-out suited what I wanted and I found a dark blue sky print with tiny stars all over it for the border. Taking pictures of this quilt is hard. It normally hangs in a hall with no room to stand and even moving it into a different room, I was struggling with a skylight overhead throwing weird lights on it.
 I decided to hand quilt it....I wanted to do the entire quilt myself. For the most part I let the fabrics guide me in how I quilted it. I knew some things that I wanted to do....rays from the suns and in other yellow areas, constellations in the blue areas, quilting the circles into the border that continued the ones in the main part of the quilt, a beaded ringed planet, etc.
 This "planet" has 6 little moons around it....3 show here.
 My ringed planet......beaded rings and quilted rings both.
 My comet....this turned out harder to do than I thought it would, and I ended up only doing one comet where I thought I would make several on the quilt! I have to starch the threads to try to keep them flowing backwards from the head of the comet. The back of the quilt in this area was a total mess of thread by the time I finished it!
 .....so on the back of the quilt I appliqued some suns and planets to cover the worse stitching areas :-) Mike likes the back of the quilt better than the front. This was not suppose to be our solar system (not enough planets), but when they decided that Pluto was no longer a planet, I decided that I would like to get some fabric with a picture of Disney's Pluto and cut out a tiny Pluto planet and add it to the back. I haven't found the fabric yet, but will do this some day :-) I thought about adding a pair of eyes somewhere on the front, also........in case there is life on the planets on the dark side of the moon :-)
 Two of the planets on the back became my label.
 After bringing my stack of partly finished blocks home from the class, I decided that I wanted to lay them out in a sort of "planet" effect and wanted a really dark circle to be a moon. I ended up using a dark flannel for all the dark circle arcs because it was darker looking than most of the cotton fabrics. I had no real "plan" at this point......as usual! I happened to watch a Simply Quilts show where they were paper piecing "rays" like in my sun block, so I immediately decided to add a sun! Well.....I hadn't done it before and it is a bit crooked, but I got the look I wanted.
 My final lay-out suited what I wanted and I found a dark blue sky print with tiny stars all over it for the border. Taking pictures of this quilt is hard. It normally hangs in a hall with no room to stand and even moving it into a different room, I was struggling with a skylight overhead throwing weird lights on it.
 I decided to hand quilt it....I wanted to do the entire quilt myself. For the most part I let the fabrics guide me in how I quilted it. I knew some things that I wanted to do....rays from the suns and in other yellow areas, constellations in the blue areas, quilting the circles into the border that continued the ones in the main part of the quilt, a beaded ringed planet, etc.
 This "planet" has 6 little moons around it....3 show here.
 My ringed planet......beaded rings and quilted rings both.
 My comet....this turned out harder to do than I thought it would, and I ended up only doing one comet where I thought I would make several on the quilt! I have to starch the threads to try to keep them flowing backwards from the head of the comet. The back of the quilt in this area was a total mess of thread by the time I finished it!
 .....so on the back of the quilt I appliqued some suns and planets to cover the worse stitching areas :-) Mike likes the back of the quilt better than the front. This was not suppose to be our solar system (not enough planets), but when they decided that Pluto was no longer a planet, I decided that I would like to get some fabric with a picture of Disney's Pluto and cut out a tiny Pluto planet and add it to the back. I haven't found the fabric yet, but will do this some day :-) I thought about adding a pair of eyes somewhere on the front, also........in case there is life on the planets on the dark side of the moon :-)
 Two of the planets on the back became my label.
This project was another fun one for me....with all the embellishing and fun stuff, but it was also very tiring trying to do the hand quilting and get it done. I got bored before I finished and there are several areas with no quilting. Oh, well....who would notice? I did machine quilting to add some "rays" to the outer border....nothing fancy.
Thursday, September 4, 2008
Nashville Quilt Show pictures link....
This is a link to a Shutterfly album of pictures from the Nashville Quilt Show that I attended a couple weeks ago. I know that several of you were interested. This does not include some of the smaller exhibits of stuff. I didn't think that Shutterfly would let me put that many photos in one album....they never have in the past. They tend to scramble the order of the quilts and separate the close-ups from the full shots.....don't know why, but not worth fixing.
http://share.shutterfly.com/share/received/album.sfly?sid=0JZNnDRq3YsWQ&startIndex=0&fid=fe927c4aa0bd7ee1
http://share.shutterfly.com/share/received/album.sfly?sid=0JZNnDRq3YsWQ&startIndex=0&fid=fe927c4aa0bd7ee1
Wednesday, September 3, 2008
Treasure Table Maze....2007
Every year at one of our guild meetings they offer a "Treasure Table" where you can buy and sell items to benefit both yourself and the guild. In 2007 they were selling sacks of "charm squares".....5" squares of donated fabric. I bought a lot of them to try making a "scrappy" quilt.
 Some of these fabrics are so ugly on their own, I wondered why on earth I wanted to use them! However, I believe that ugly fabric can be made into beautiful quilts when used in a scrappy project. I decided to do a simple half square triangle design with half light and half dark in each square and see what I ended up with. There were not very many true "lights" in the batch that I bought, but I managed to find mixes that weren't too bad and then laid them out in a sort of maze. It was fun playing with the lines and colors trying to get something that I liked in the end!
 The finished project was not going to be large enough to cover a queen size bed and I didn't want to add a lot of fabric of my own. So I added a border to the top that required off-whites from my stash and then appliqued simple flowers on it and put yo-yo's in their centers. I also added an extra wide green border at the bottom to help make it longer. It still does not cover the pillows and I am making shams to use with it.
 Once again, Linda B did the quilting and quilted beautiful flowers in the bottom border and leaves in the top border....gorgeous! I love what she did with it.
 An extra flower went on the back for a label.
It happened to be the year of our local quilt show, so I hung this quilt as my entry. Our show is not juried or judged and everyone in the guild is encouraged to hang something.
 It was a lot of fun to see my quilt hanging in the show! It really made me feel like a quilter after years of "practice" .......now we are preparing for our show in 2009!

 Some of these fabrics are so ugly on their own, I wondered why on earth I wanted to use them! However, I believe that ugly fabric can be made into beautiful quilts when used in a scrappy project. I decided to do a simple half square triangle design with half light and half dark in each square and see what I ended up with. There were not very many true "lights" in the batch that I bought, but I managed to find mixes that weren't too bad and then laid them out in a sort of maze. It was fun playing with the lines and colors trying to get something that I liked in the end!
 The finished project was not going to be large enough to cover a queen size bed and I didn't want to add a lot of fabric of my own. So I added a border to the top that required off-whites from my stash and then appliqued simple flowers on it and put yo-yo's in their centers. I also added an extra wide green border at the bottom to help make it longer. It still does not cover the pillows and I am making shams to use with it.
 Once again, Linda B did the quilting and quilted beautiful flowers in the bottom border and leaves in the top border....gorgeous! I love what she did with it.
 An extra flower went on the back for a label.
It happened to be the year of our local quilt show, so I hung this quilt as my entry. Our show is not juried or judged and everyone in the guild is encouraged to hang something.
 It was a lot of fun to see my quilt hanging in the show! It really made me feel like a quilter after years of "practice" .......now we are preparing for our show in 2009!
 Mary's Quilt Thoughts #2...
It's funny but when I chose the name for my blog, I didn't even think about "corners" for the header photos! I just accidentally did one and then suddenly the "light bulb" came on and I realized how appropriate it was considering the name, and that I would have an endless supply of photos for the header :-) A lot about quilting is often "accidental" and we start one thing and then end up with something totally different. Little "light bulbs" of inspiration are what end up making our quilts special and teach us things.
Subscribe to:
Posts (Atom)